Petersen Museum Build - MOTHER'S WORRY

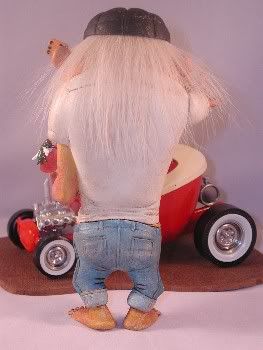
Who could forget those wild Monsters like Wild Child, MrGasser, Junkyard Kid, Mother's Worry, etc...? Share your Monster memories, pictures, toys, models, decals, shirts, etc....

Moderator: weldonmc

Post Reply
User avatar
weldonmc
Posts: 237
Joined: Sun Feb 06, 2005 8:19 pm

Petersen Museum Build - MOTHER'S WORRY

Post by weldonmc » Fri Jun 05, 2009 4:26 am

This is Mother's Worry.

Image Image Image Image

Additional things completed so far:

1.) Tonneau cover was made from sheet plastic. Glazing putty was used to fill the seam then a White enamel primer was sprayed on. A ScotchBrite pad was used on the wet primer to give the cover a vinyl texture. (13) holes were drilled into the lower edge for snaps. The heads on a few pins will be trimmed off to simulate snaps. Once the '23 T body is painted the cover will be placed back on and the body drilled to match. The pin heads will be insert completing the look.
2.) Alclad Chrome was airbrushed to simulate chrome.
3.) Aluminum tubing was used for carb intake stacks.
4.) The Steering column and shifter arm were made from plastic coated wire.
5.) The shifter knob is a small dice that was made in the 50's.
6.) The gas cap and filler tube was made from plastic tubing. The gas tank is pinned to both sides of the rear frame.
7.) The rear frame rails were boxed using sheet plastic.
8.) A plastic tube was slipped inside aluminum tubing for the center section of the axle. Aluminum tubing was also used on the outer ends of the axle.

Everything is pretty much just stuck on and ready to be taken apart for paint.

More coming! ...Weldon
I have been a FINKSTER since 1963. I enjoy building, painting, and restoring all of Roth's Monster models ...Weldon

User avatar
weldonmc
Posts: 237
Joined: Sun Feb 06, 2005 8:19 pm

Post by weldonmc » Thu Jun 18, 2009 4:59 am

I have't posted anything in several days and I have a few shots of the progress on Mother's Worry.

Image Image Image Image Image

The '23 T color is Testors Paints by Boyd "Sunburst". The tonneau cover will be put in place and matching holes drilled through the bucket and trimmed pins pushed in to simulate snaps. A distributor, plug wires, and boots will be added to the engine. The grill and headlights will be airbrushed chrome. The figure got a goatee, a cracked leather cap (THANKS Al!), and a woven waxed chord bracelet to conceal the seam at his wrist ...the hand still turns. It will get the eyes painted and clear coated too. Both the car and figure will be attached to the base with #2 brass screws.

Finished pics and a re-cap in a couple of days ....Weldon
I have been a FINKSTER since 1963. I enjoy building, painting, and restoring all of Roth's Monster models ...Weldon

User avatar
weldonmc
Posts: 237
Joined: Sun Feb 06, 2005 8:19 pm

Post by weldonmc » Tue Jun 23, 2009 11:51 pm

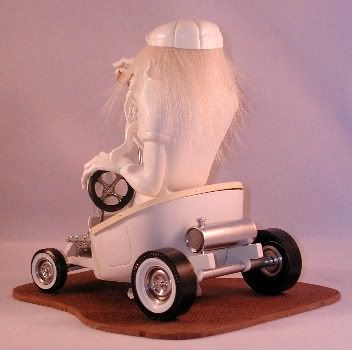
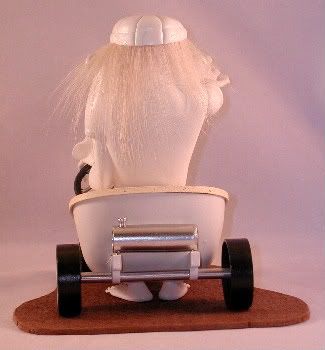
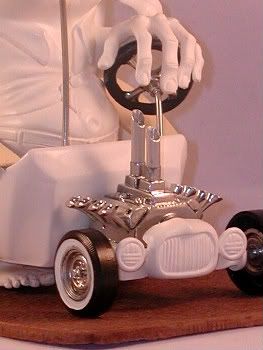
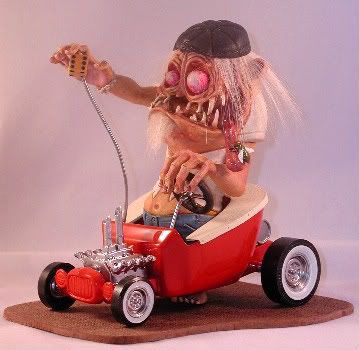
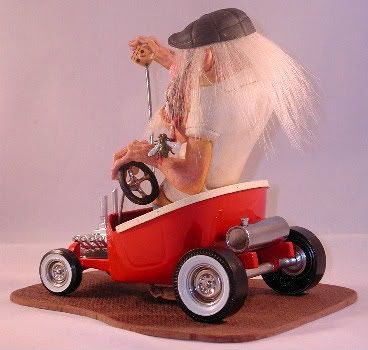
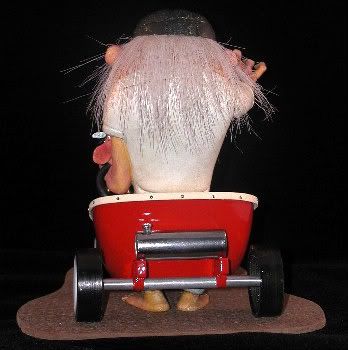
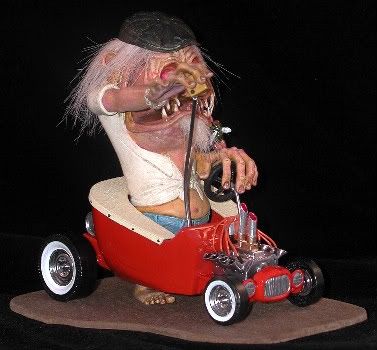
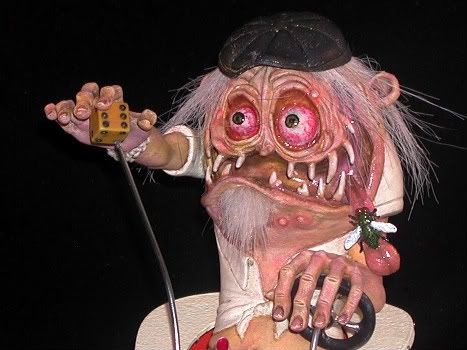
Mother's Worry is finished and I have a few finished pictures and a re-cap of everything for you.

This is the list of additional things done to the kit:

1.) Tonneau cover was made from sheet plastic. Holes were drilled and pin heads were inserted to simulate snaps.
2.) Alclad Chrome was airbrushed to simulate chrome.
3.) Aluminum tubing was used for carb intake stacks.
4.) The Steering column and shifter arm were made from plastic coated wire.
5.) The shifter knob is a small dice from the 1950's.
6.) The gas cap and filler tube was made from plastic tubing. The gas tank is pinned to both sides of the rear frame.
7.) The rear frame rails were boxed using sheet plastic.
8.) A plastic tube was slipped inside aluminum tubing for the center section of the axle. Aluminum tubing was also used on the outer ends of the axle.
9.) A small slot was cut under the lower lip and a small piece of fur stuffed in for the goatee. The hair piece was glued to the underside of the cap.
10.) A distributor was made from plastic tubing and plug wires made from telephone wire.
11.) The figure was painted with blended King's Gold, Ivory, and Rose acrylic craft paints ...then the high spots of the plastic dry brushed with a lighter shade. An oil based walnut stain was applied then wiped off highlighting the lower are details.
12.) A high gloss clear nail polish was used on the the eyes, teeth, lips, tongue, finger and toenails.
13.) Testors Paints by Boyd "Sunburst" was airbrushed onto the '23 T then top coated with a catalyzed automotive clear.
14.) The engine was attached with two 1/2 x 2 brass screws.
15.) The figure and T-bucket are secured to the 1/8" Masonite base with 1/2 x 2 Brass screws.
16.) A woven bracelet was made from waxed chord to conceal the seam at his wrist ...the hand still turns.
17.) The cracked leather effect for the cap was achieved by first painting it with a light brown paint, then a coat of crackle paint, then painted with black.

Image Image Image Image Image Image

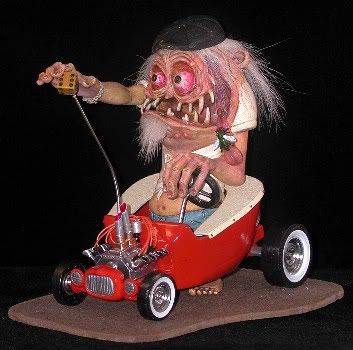
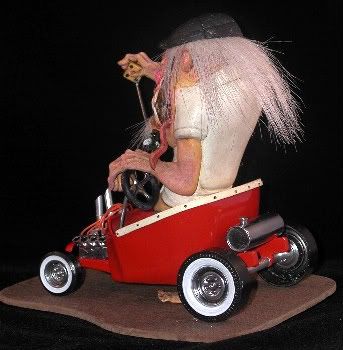
Hope you like it! Looks like DRAGNUT is the next one ...Weldon
I have been a FINKSTER since 1963. I enjoy building, painting, and restoring all of Roth's Monster models ...Weldon

Post Reply