Rat Fink Model Tips
Moderator: weldonmc


SORRY MOLDY ...I MESSED YOUR "TIPS" UP TRYING TO MOVE THEM HERE ...SO I COPIED THIS FROM YOUR RATFINK.ORG SITE ...IF YOU WANT TO POST THEM AGAIN THE WAY YOU HAD THEM POSTED EARLIER I WILL DELETE THIS POST
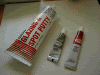
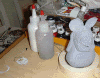
These are some of the supplies that yer gonna need some, Bondo Glazing Putty and Old School Testors Glue.
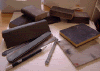
Cutting and Sanding Supplies are always handy ta have. You'll need some paint too.

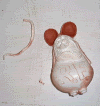
First make sure all of yer pieces are there.
After ya pluck yer pieces off of tha trees sand'em down a bit and check out how yer seems are goin' ta go together.
Note: some of this here stuff that we're usin' is sorta toxic and can really give ya a buzz so moms and dads make sure that ya got plenty of ventilation so little Johnny don't get permanent brain damage.
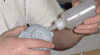
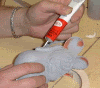
Now ya can start gluein' yer Rat Fink together. Don't be afraid ta get it on there real good this here is a monster model and yer gonna want ta weld them seems real good.
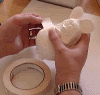
Now put the front and back together.. sorta smash it together and let the glue sorta really melt tha plastic good. then Tape o'l Finky together.

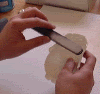
Let him set up pretty good or even better yet let'em dry completely. Pull off yer tape and start sandin' the seams down so's they disappear.
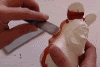
Start with some type of emery board and then ya can go to a fine sanding sponge.

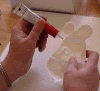
Now take some of that Bondo Glazing Putty and finish off the seams with it buy buldin' over the seams.
You will notice that there is a Big Ugly Seam in Rat Finks Ears. Fill them Seams Up with the Putty.
Now here is the tricky part:
DON'T FILL HIS EARS ALL AT ONCE YA GOTTA DO IT A LITTLE AT A TIME OR YOU WILL MELT THEM. This here Bondo Stuff is Radical man.
Let him set up pretty good or even better yet let'em dry completely and start sandin' the seams down so's they disappear.
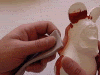
Yer gonna sor'ta sculpt the seams away.

I'm Gonna Say it Once Again:
DON'T FILL HIS EARS ALL AT ONCE YA GOTTA DO IT A LITTLE AT A TIME OR YOU WILL MELT THEM. This here Bondo Stuff is Radical man.

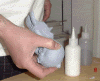
O.K. Now check this out. Primer yer Fink real good and then if'in ya want ta add some weight to'em drill a hole'bout 1/4" near wear his tail goes.

Then Squirt some white glue into the hole.
Then ya get yer self some real fine sand and squirt some of that in the hole too.
Then stick yer finger over tha hole and shake yer Fink up real good. At first the sand will be loose inside then it will start mixin' with the glue and start sicken to tha sides.
do this step'bout three ta four times until o'l Finky's got some weight to'em

Cover the Hole up with some maskin' tape
Let him set up over night ta dry real good.
After he dries ya can take some of that Testors glue and make wartz and bumps all over Finky's Arms and stuff. Let it dry and if'in ya need to ya can go back over them once that tha glue is dry ta build them up ta add some texture.
Here is a little project that will take quite a few days to accomplish but it looks really cool when yer done.
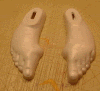
Take that Toxic Bondo Glaze and fill the bottom of Rat Finks feet up with the stuff.
After ya fill'em turn them over and let'em set fer a day.. after awhile that bondo guew will start meltin' tha plastic and sorta warp the surface so's that the feet look like they got veins in'em. They'll even get mushy so's ya can sorta sculpt'em if ya want.
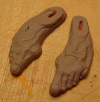
Let them set up pretty good it's gonna take about a week fer'em ta dry enough ta work with them again.
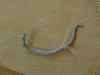
Then ya can do some things like tie a rag on Finky's tail.
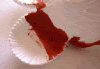
So lets talk a little about paint. We used old school Flat Enamel. First thing ta do is the Black line. You can use a combination of sharp felt tip markers and flat black paint.
Don't worry about makin' yer lines thick cuz yer gonna go back over them with the other colors any way
Make sure ya let the black dry really good so it don't blend in with the other colors that you'll be layin' down.

In fact Testors or Model Master (# 1960) makes a Clear Flat Lacquer OverCoat that ya can spray in between coats of paint to seal each color.

The Clear Lacquer also seems to speed up the dryin' process. Only use the Clear Lacquer if'in yer using enamel or oil paint.
DON'T USE THA LACQUER WITH THE NEW ACRYLIC WATER BASED ENAMELS CUZ THEY WON'T WERK !!! DANGER

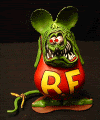
You can see that we detailed our little wartz and bumps by using a little darker green. Ya can either add a little black or blue to the green to get that effect. And if'in ya want to highlight Finky's skin ya can also add yellow to the green in places.
These are some of the supplies that yer gonna need some, Bondo Glazing Putty and Old School Testors Glue.
Cutting and Sanding Supplies are always handy ta have. You'll need some paint too.
First make sure all of yer pieces are there.
After ya pluck yer pieces off of tha trees sand'em down a bit and check out how yer seems are goin' ta go together.
Note: some of this here stuff that we're usin' is sorta toxic and can really give ya a buzz so moms and dads make sure that ya got plenty of ventilation so little Johnny don't get permanent brain damage.
Now ya can start gluein' yer Rat Fink together. Don't be afraid ta get it on there real good this here is a monster model and yer gonna want ta weld them seems real good.
Now put the front and back together.. sorta smash it together and let the glue sorta really melt tha plastic good. then Tape o'l Finky together.
Let him set up pretty good or even better yet let'em dry completely. Pull off yer tape and start sandin' the seams down so's they disappear.
Start with some type of emery board and then ya can go to a fine sanding sponge.
Now take some of that Bondo Glazing Putty and finish off the seams with it buy buldin' over the seams.
You will notice that there is a Big Ugly Seam in Rat Finks Ears. Fill them Seams Up with the Putty.
Now here is the tricky part:
DON'T FILL HIS EARS ALL AT ONCE YA GOTTA DO IT A LITTLE AT A TIME OR YOU WILL MELT THEM. This here Bondo Stuff is Radical man.
Let him set up pretty good or even better yet let'em dry completely and start sandin' the seams down so's they disappear.
Yer gonna sor'ta sculpt the seams away.
I'm Gonna Say it Once Again:
DON'T FILL HIS EARS ALL AT ONCE YA GOTTA DO IT A LITTLE AT A TIME OR YOU WILL MELT THEM. This here Bondo Stuff is Radical man.
O.K. Now check this out. Primer yer Fink real good and then if'in ya want ta add some weight to'em drill a hole'bout 1/4" near wear his tail goes.
Then Squirt some white glue into the hole.
Then ya get yer self some real fine sand and squirt some of that in the hole too.
Then stick yer finger over tha hole and shake yer Fink up real good. At first the sand will be loose inside then it will start mixin' with the glue and start sicken to tha sides.
do this step'bout three ta four times until o'l Finky's got some weight to'em
Cover the Hole up with some maskin' tape
Let him set up over night ta dry real good.
After he dries ya can take some of that Testors glue and make wartz and bumps all over Finky's Arms and stuff. Let it dry and if'in ya need to ya can go back over them once that tha glue is dry ta build them up ta add some texture.
Here is a little project that will take quite a few days to accomplish but it looks really cool when yer done.
Take that Toxic Bondo Glaze and fill the bottom of Rat Finks feet up with the stuff.
After ya fill'em turn them over and let'em set fer a day.. after awhile that bondo guew will start meltin' tha plastic and sorta warp the surface so's that the feet look like they got veins in'em. They'll even get mushy so's ya can sorta sculpt'em if ya want.
Let them set up pretty good it's gonna take about a week fer'em ta dry enough ta work with them again.
Then ya can do some things like tie a rag on Finky's tail.
So lets talk a little about paint. We used old school Flat Enamel. First thing ta do is the Black line. You can use a combination of sharp felt tip markers and flat black paint.
Don't worry about makin' yer lines thick cuz yer gonna go back over them with the other colors any way
Make sure ya let the black dry really good so it don't blend in with the other colors that you'll be layin' down.
In fact Testors or Model Master (# 1960) makes a Clear Flat Lacquer OverCoat that ya can spray in between coats of paint to seal each color.
The Clear Lacquer also seems to speed up the dryin' process. Only use the Clear Lacquer if'in yer using enamel or oil paint.
DON'T USE THA LACQUER WITH THE NEW ACRYLIC WATER BASED ENAMELS CUZ THEY WON'T WERK !!! DANGER
You can see that we detailed our little wartz and bumps by using a little darker green. Ya can either add a little black or blue to the green to get that effect. And if'in ya want to highlight Finky's skin ya can also add yellow to the green in places.
I have been a FINKSTER since 1963. I enjoy building, painting, and restoring all of Roth's Monster models ...Weldon